Achieving broadcast quality in a small bedroom studio isn’t about buying more expensive gear; it’s about mastering the technical systems of light, heat, audio, and data like a broadcast engineer.
- Manage heat not as a nuisance, but as a « thermal budget » where every watt of light has a measurable thermal cost.
- Choose microphones and backgrounds based on your room’s specific acoustic and spatial limitations, prioritising substance over trends.
- Mastering your OBS bitrate and network stability is as crucial to your final quality as your camera and lens.
Recommendation: Stop thinking like a hobbyist buying gadgets and start operating like an engineer optimising a complete production system.
For UK content creators, the dream of a professional stream often clashes with the reality of a small bedroom studio. You’ve invested in a good camera, a decent microphone, and maybe even a popular ring light, yet the final result feels underwhelming. Worse, after an hour of streaming, your room feels like a sauna, your PC fans are screaming, and your video quality seems to degrade. Many guides will tell you to simply « buy LED lights » or follow a generic « three-point lighting » diagram, but these platitudes fail to address the core issue for creators in confined spaces: heat and efficiency.
The conventional wisdom is fundamentally flawed for a bedroom setup because it ignores the physics of the environment. A small, often poorly ventilated room has a very limited capacity to absorb the heat generated by lights, PCs, and monitors. This leads to thermal throttling of your equipment and physical discomfort for you, the creator. The key to unlocking professional quality isn’t about adding more, brighter lights. It’s about adopting the mindset of a broadcast engineer.
The real secret lies in treating your studio as a complete thermal and optical system. It’s about maximising the efficiency of every watt of energy and every photon of light to achieve your desired look without paying the price in heat. This guide will deconstruct the common technical hurdles faced by home-based creators, from lighting and audio to encoding and network stability. We will move beyond simple tips and into the engineering principles that allow professionals to deliver flawless quality, every single time, no matter the size of the studio.
This article will provide a systematic breakdown of the most critical areas you need to master to elevate your production value. The following sections offer a comprehensive technical reference for troubleshooting and optimising your entire streaming workflow.
Summary: A Technical Manual for Home Studio Optimisation
- Dynamic vs Condenser Mics: Which Is Better for Untreated Rooms?
- OBS Bitrate Guide: What Settings prevent Pixelation on Fast-Moving Games?
- Green Screen vs Real Background: Which Looks More Professional for Tech Reviews?
- Prime Lens Aperture: How to Get That « Blurry Background » Look on a Budget?
- Lip Sync Issues: How to Fix the Delay Between Your Mouth and the Mic?
- Range Extender or Powerline Adapter: Which Is Better for a Detached Garage?
- Why Your Mac Fans Spin Loudly During Video Calls and How to Fix It?
- Mac Maintenance: How to Keep a MacBook Pro Running Fast After 4 Years?
Dynamic vs Condenser Mics: Which Is Better for Untreated Rooms?
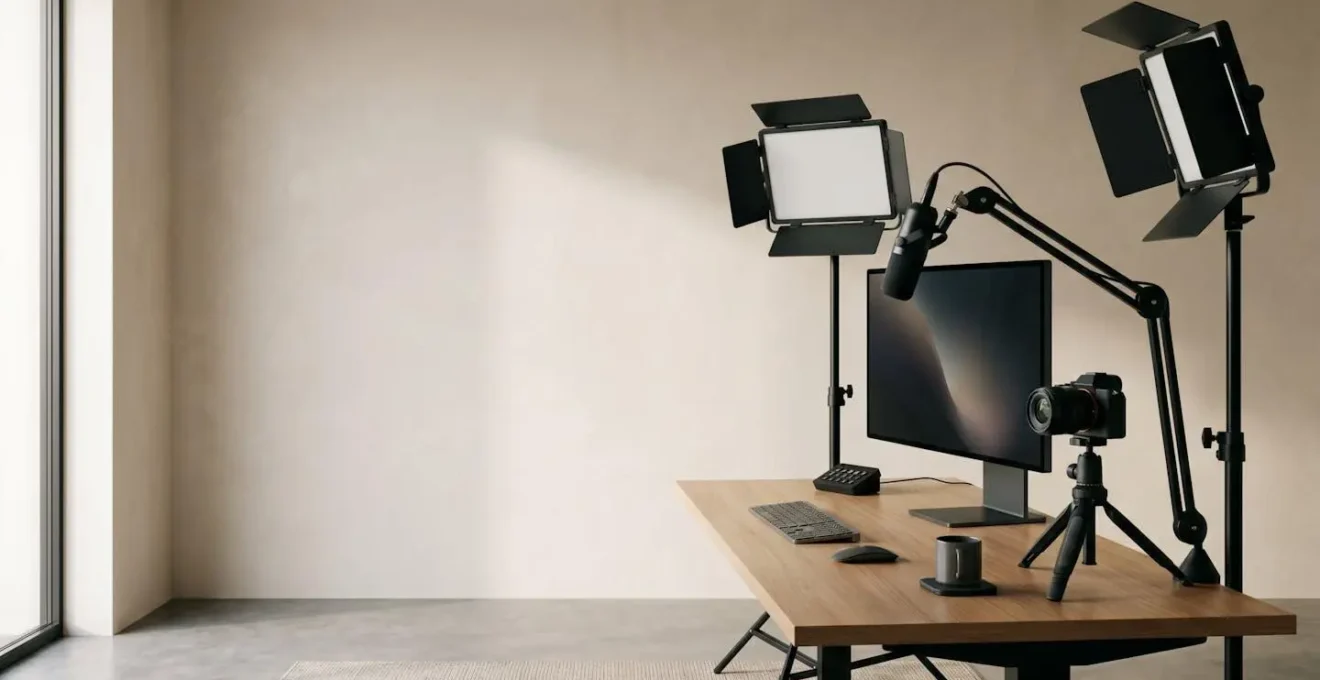
Before an audience sees your perfect lighting, they hear your voice. In an untreated room—like most bedrooms—audio quality is dictated by how well you can reject unwanted noise. This is where the engineering choice between a dynamic and a condenser microphone becomes critical. Condenser mics are prized in professional studios for their sensitivity and detail, but in a bedroom, that sensitivity is a liability. It will pick up every echo from your bare walls, the hum of your PC fans, and the traffic outside your window.
A dynamic microphone, by design, is far less sensitive. It requires you to be close to it (a concept known as working distance) and primarily captures sound directly in front of it. This inherent directionality makes it a natural filter for the ambient noise of an untreated space. For most streamers, especially those in small rooms without acoustic panels, a high-quality broadcast dynamic mic is the superior engineering choice. It solves the problem of background noise at the source, rather than trying to fix it later with software that can often degrade your vocal quality.
The image above demonstrates the ideal working distance for a dynamic mic. Notice the close proximity required to capture a rich, clean vocal tone. This technique, known as leveraging the « proximity effect, » naturally boosts the low-end frequencies of your voice, giving it that classic broadcast warmth while simultaneously minimising the pickup of distant room reflections. It’s a physical solution to an acoustic problem, and in-studio engineering, physical solutions are always preferred over digital fixes.
OBS Bitrate Guide: What Settings prevent Pixelation on Fast-Moving Games?
Once your audio and video are captured cleanly, the next challenge is transmitting them to your audience without degradation. For gamers, the most common complaint is pixelation during fast-motion scenes. This isn’t a camera problem; it’s an encoding and data-rate problem. Your bitrate, measured in kilobits per second (Kbps), is the amount of data you allocate to describe each second of video. When movement is high, more data is needed to describe the changing frames accurately. If the bitrate is too low, the encoder is forced to generalise, resulting in the blocky, pixelated mess that destroys image quality.
Choosing the right bitrate is a balancing act between quality and stability. You are limited by the platform’s ingest servers (Twitch, for example, has recommended maximums) and, more importantly, your own internet upload speed. As a rule of thumb, professional streaming engineers recommend keeping total bitrate within 70-80% of your tested upload speed to leave a buffer for network fluctuations. Using a hardware encoder like NVIDIA’s NVENC is also highly recommended for gaming, as it offloads the intensive encoding process from your CPU, preventing in-game performance drops.
The following table provides a professional baseline for setting your OBS bitrate. These are starting points; you must test what works best for your specific game, hardware, and internet connection, as shown in this comprehensive streaming settings analysis.
| Resolution & FPS | Hardware Encoder (NVENC/AMF) | Software Encoder (x264) | Use Case |
|---|---|---|---|
| 720p @ 30fps | 2,500-4,000 Kbps | 2,500-3,500 Kbps | Low-motion content, tutorials |
| 720p @ 60fps | 3,500-5,000 Kbps | 4,000-4,500 Kbps | Moderate-motion gaming |
| 1080p @ 30fps | 3,000-4,500 Kbps | 3,000-4,000 Kbps | Talking-head streams, podcasts |
| 1080p @ 60fps | 4,500-9,000 Kbps | 4,500-6,000 Kbps | Fast-motion gaming, action |
| 1440p @ 60fps | 9,000-12,000 Kbps | 8,000-10,000 Kbps | High-fidelity content |
| 4K @ 60fps | 25,000-50,000 Kbps | Not recommended | Professional production only |
Remember, a higher resolution like 1080p at 60fps demands a significantly higher bitrate, especially for fast-paced games. If your upload speed cannot reliably support 6,000 Kbps or more, you will achieve a much cleaner and more stable stream by broadcasting at 720p @ 60fps with a solid 4,500 Kbps than a pixelated 1080p stream.
Green Screen vs Real Background: Which Looks More Professional for Tech Reviews?
Your background is not just what’s behind you; it’s a part of your set design and brand identity. For tech reviewers, the choice between a digital green screen background and a curated real-world set is a major professional decision. While a green screen offers infinite flexibility, it often looks less professional on platforms like YouTube and Twitch, especially on a budget. The reason is technical and tied directly to the streaming compression we just discussed.
As experts from StreamYard’s technical team point out, the constant compression and decompression inherent to streaming can wreak havoc on a chroma key.
Compression artifacts and spill are the technical reasons why green screens often look unprofessional on platforms like YouTube/Twitch, where compression revealing flaws and green spill on the subject undermine the intended effect.
– StreamYard Technical Documentation, Setting Up a Home Video Studio on a Budget
Imperfect lighting leads to « spill, » a faint green halo around your hair and shoulders, and compression algorithms struggle with the artificially sharp edges, creating a shimmering, unprofessional look. A real, physical background, even a simple one, feels more authentic and tangible. It allows you to use real-world depth and lighting to create a sense of place and professionalism that a digital background struggles to replicate.
The MKBHD Studio Background Strategy
Top-tier tech reviewers like Marques Brownlee have built iconic brands through carefully curated real-world studio backgrounds. They feature intentional product displays, geometric lighting installations, and considered spatial design. This strategy creates a level of authenticity and viewer trust that generic virtual backgrounds cannot match, particularly when reviewing a physical product where tangible context enhances credibility. The key is treating the background as an extension of the review itself, showcasing complementary tech and maintaining visual consistency across videos. It demonstrates a commitment to production value that resonates with a tech-savvy audience.
For a tech reviewer, a real background allows you to ground the product you’re reviewing in a real space. It enhances credibility and avoids the distracting artifacts of a poorly executed chroma key. Building a simple, clean, and well-lit background is a better investment of time and resources than fighting with a cheap green screen setup.
Prime Lens Aperture: How to Get That « Blurry Background » Look on a Budget?
One of the most sought-after visual characteristics of a professional stream is a shallow depth of field (DOF)—that « blurry background » effect, professionally known as bokeh. This effect separates you from your environment, directs the viewer’s focus, and makes your entire shot look more cinematic and high-quality. Many creators assume this requires expensive cinema cameras, but it’s actually a function of optics, specifically the aperture of your lens.
The key is a « fast » prime lens. A prime lens has a fixed focal length (e.g., 35mm, 50mm) and typically features a very wide maximum aperture, denoted by a low f-number like f/1.8 or f/1.4. The wider the aperture (the lower the number), the shallower the depth of field, and the blurrier the background will be. Budget-friendly 50mm f/1.8 prime lenses, often called the « nifty fifty, » are available for almost every camera system and are the single most cost-effective upgrade for achieving this professional look.
However, you don’t even need a new lens to improve your depth of field. The effect is a product of three factors: aperture, focal length, and distance. You can maximise background blur even with a standard kit lens by following a few simple optical principles:
- Increase the physical distance between yourself and your background. A minimum of 6-8 feet is ideal.
- Position yourself closer to the camera, while maintaining a good frame.
- Use the longest focal length (zoom) your lens and room allow. 55mm will create more separation than 18mm.
- Add small, distant light sources (like fairy lights) to your background to create attractive circular bokeh highlights.
- Light yourself and your background separately to enhance the perception of depth.
Lip Sync Issues: How to Fix the Delay Between Your Mouth and the Mic?
There is no technical issue more distracting or unprofessional than an audio/video synchronisation problem. When your mouth moves and the sound follows a fraction of a second later, it breaks the viewer’s immersion completely. This latency can be introduced at multiple points in your signal chain: USB processing, camera video processing, audio plugins, or OBS itself. Fixing it requires a systematic, engineering-led diagnostic process.
The first step is to establish a reliable measurement. Do not try to sync it « by eye » while speaking. You need a sharp, transient sound paired with a clear visual cue. A simple hand clap in front of your face is the universal slate used in film and broadcast production for this exact purpose. By recording a clap and then examining the footage frame-by-frame, you can measure the precise offset between the visual of your hands meeting and the audio spike in your waveform.
Once you know the exact delay in milliseconds (ms), you can apply a compensating offset. In OBS, this is handled in the Advanced Audio Properties via the « Sync Offset » field. If your audio is late, you’ll apply a negative offset to pull it earlier. If your audio is early (less common), you’ll apply a positive offset to delay it. Remember that some audio plugins (like complex noise reduction or EQs) add their own processing latency, so it’s wise to perform your initial test with all audio plugins disabled to get a clean baseline.
Your Action Plan: Systematic Audio Latency Diagnosis
- Create a visual sync reference by clapping your hands directly in front of the camera while recording.
- In OBS, review the recording frame-by-frame to measure the exact delay between the visual clap and the audio spike.
- Navigate to OBS Settings > Advanced > Audio and apply a compensating delay (negative values pull audio earlier, positive delays it).
- Disable audio plugins temporarily (noise suppression, EQ, compression) to identify if processing latency is the culprit.
- Test different USB ports and eliminate USB hubs—connect the microphone and camera directly to motherboard USB 3.0 ports.
Follow this diagnostic checklist methodically. Change one variable at a time and re-test with the clap method to confirm your results. This ensures you identify the true source of the latency rather than just masking one problem with another.
Range Extender or Powerline Adapter: Which Is Better for a Detached Garage?
For creators with a dedicated studio space in a detached garage or outbuilding, network stability is the primary engineering challenge. The Wi-Fi signal from your main house router is often too weak and unreliable for streaming, an activity that is highly sensitive to packet loss and jitter. In fact, research on streaming platform preferences shows 67% of viewers consider video quality the most critical factor, and poor network connectivity is the number one cause of quality degradation.
The two most common DIY solutions are Wi-Fi range extenders and Powerline adapters. A range extender simply picks up your existing Wi-Fi signal and rebroadcasts it, effectively cutting the available bandwidth in half and adding significant latency. It’s a poor choice for serious streaming. A Powerline adapter is a more robust solution, using your home’s electrical wiring to transmit the network data. It provides a more stable, lower-latency connection, akin to being plugged directly into your router, provided both plugs are on the same electrical circuit.
However, for a truly professional and reliable link to a detached studio, neither of these is the broadcast-grade solution. An engineer would recommend a dedicated Point-to-Point (P2P) wireless bridge or, for the ultimate in stability, a direct-burial Ethernet cable.
This comparative analysis from a guide to home studio setups shows the trade-offs in latency and bandwidth for each solution.
| Solution | Latency (Typical) | Jitter | Bandwidth | Installation | Best For |
|---|---|---|---|---|---|
| Wi-Fi Range Extender | 15-40ms added | High variability | 50-70% of source | Easy, plug-and-play | Casual streaming, backup solution |
| Powerline Adapter | 5-15ms added | Moderate | 80-95% of rated speed | Moderate, same-phase required | Same electrical circuit only |
| Point-to-Point Wireless Bridge | 2-8ms | Low, consistent | 90-100% of rated speed | Advanced, directional setup | Dedicated studio, line-of-sight available |
| Direct-Burial Ethernet | <2ms | Negligible | 1000 Mbps (gigabit) | Professional installation | Permanent professional setup |
For any serious creator, investing in a Powerline adapter at a minimum, or ideally a P2P bridge, is a necessary step to guarantee the stable, low-latency connection required for high-bitrate streaming.
Why Your Mac Fans Spin Loudly During Video Calls and How to Fix It?
Many creators using a MacBook for streaming or video conferencing notice a common issue: within minutes of going live, the fans spin up to maximum speed, creating distracting background noise. This is a symptom of thermal stress. Video encoding and decoding are among the most CPU and GPU-intensive tasks a computer can perform. When you add high-resolution webcams, virtual backgrounds, and screen sharing, you are pushing the compact thermal system of a laptop to its absolute limit.
The loud fan noise is your Mac’s only defence against overheating. When the processor temperature hits a certain threshold, the system aggressively increases fan speed to dissipate heat. If that’s not enough, it will begin to « throttle » performance, reducing clock speeds to lower thermal output, which can lead to stuttering video and system lag. The solution is not to ignore the fans, but to reduce the underlying thermal load on your system.
You can proactively manage your Mac’s thermal output with a few key software and environmental adjustments. The goal is to reduce the workload on the CPU and GPU, giving the cooling system a chance to keep up without running at 100%. Follow these steps to significantly quieten your machine during live sessions:
- Force hardware video encoding: In apps like Zoom or Teams, find the video settings and ensure any hardware acceleration options are enabled. Disable « HD video » if you don’t need it to reduce the encoding load.
- Limit external display resolution: Driving a 4K external monitor requires immense GPU power. During calls, temporarily switch your display resolution down to 1080p.
- Close background applications: Use Activity Monitor (in Applications/Utilities) to find and quit any non-essential apps, especially web browsers with many tabs, that are consuming CPU cycles.
- Enable ‘Low Power Mode’: In System Settings > Battery, enabling this mode reduces the processor’s maximum performance, generating less heat from the start.
- Improve physical cooling: Never use your MacBook on a soft surface like a bed or sofa. Ensure it’s on a hard, flat surface or a laptop stand that allows for clear airflow to the intake vents.
Even your studio lighting can be a factor. If high-output lights are raising the ambient temperature of your room, they are making it harder for your Mac to cool itself. Every degree matters in a laptop’s thermal system.
Key Takeaways
- Master your thermal budget by choosing efficient, low-wattage LED lights with high CRI, not just the brightest ones.
- In an untreated room, a dynamic microphone’s noise rejection is almost always a better engineering choice than a sensitive condenser mic.
- Your stream quality is defined by its weakest link; a stable, low-latency network connection is as important as your camera.
Mac Maintenance: How to Keep a MacBook Pro Running Fast After 4 Years?
For a content creator, your computer is not just a tool; it’s the core of your business. Keeping a MacBook Pro running at peak performance after four or more years of intensive use for video editing and streaming requires a proactive maintenance strategy. Over time, performance degradation is caused by three main factors: storage drive slowdown, battery degradation, and thermal paste decay.
First, the internal SSD (Solid State Drive) performance degrades as it fills up. For optimal speed, you must keep at least 20% of your internal drive free. A full drive has no free blocks for wear-levelling and garbage collection, leading to significant slowdowns in read/write speeds, which you’ll feel directly during video editing.
Professional Workflow Storage Management for Video Creators
Professional creators maintain long-term MacBook performance by implementing a tiered storage strategy. Active projects are kept on fast external Thunderbolt 3 SSDs. Completed or archived projects are moved to a larger, slower NAS (Network Attached Storage) drive or cloud storage. This keeps the internal drive free and fast, dedicated only to the OS and applications. This workflow prevents the degradation that occurs when internal drives stay above 80% capacity and eliminates system slowdowns caused by memory pressure from full storage. It’s a fundamental part of a professional digital asset management plan.
Second, your battery’s health is directly linked to your Mac’s performance. As Apple’s own documentation confirms, a degraded battery can trigger the system’s performance management features, throttling the CPU to prevent unexpected shutdowns. This is why a simple battery replacement on an older MacBook Pro can often feel like a major processor upgrade—it removes the performance bottleneck. Finally, the thermal paste between the CPU/GPU and the heatsink dries out over several years, becoming less effective at transferring heat. For a machine under constant heavy load from video work, having a professional replace the thermal paste after 3-4 years can dramatically improve its cooling efficiency, reduce fan noise, and allow it to sustain peak performance for longer.
By adopting an engineering mindset across your entire workflow—from lighting and audio to software and hardware maintenance—you can transform your small bedroom setup into a highly efficient and professional production studio.