Achieving the best HDR gaming picture is not about choosing a single format, but about ensuring every link in your « visual fidelity chain » is optimized.
- Dolby Vision’s dynamic metadata offers superior scene-by-scene optimization, but its benefits are lost if your display’s peak brightness is too low or your cable can’t handle the bandwidth.
- HDR10, while simpler, can deliver a stunning experience when paired with a high-quality display and proper console-level calibration like HGiG.
Recommendation: Prioritize a display with high peak brightness (600+ nits) and HGiG support first. Then, ensure you have a certified HDMI 2.1 cable. Dolby Vision is a powerful advantage, but it’s the final polish on a solid hardware foundation.
For any gamer investing in a PlayStation 5 or Xbox Series X, the promise of High Dynamic Range (HDR) is a major selling point. The format war, primarily between the baseline HDR10 and the premium Dolby Vision, has created significant confusion. Many articles and videos simply declare a winner, reducing a complex topic to a brand choice. They’ll tell you to check for a logo on a box, but rarely explain the technical realities that determine whether you’ll actually see a mind-blowing visual or a washed-out, dim picture.
The common advice is to « just get Dolby Vision, » but this ignores the full picture. The truth is that the final image quality you see is the result of a complete system: the game’s source code, the console’s processing, the data-carrying capacity of your HDMI cable, and, most critically, your television’s ability to interpret and display that information. This is the visual fidelity chain, and it’s only as strong as its weakest link. A TV with Dolby Vision but poor underlying hardware will never outperform a well-calibrated HDR10 display with excellent specifications.
But what if the key wasn’t picking a format, but understanding how to master this entire chain? This guide moves beyond the marketing debate. As a display calibration specialist, my goal is to empower you with the knowledge to diagnose your setup and make informed decisions. We will break down the critical components—from peak brightness and cabling to gamma settings and metadata—to reveal what truly creates a breathtaking HDR gaming experience.
This article will guide you through the essential technical concepts and practical adjustments that make a real difference on screen. By understanding these fundamentals, you can ensure you’re getting the absolute most out of your high-end gaming setup, regardless of the HDR format you use.
Summary : A Calibration Expert’s Guide to HDR Gaming Fidelity
- Peak Brightness: Why 400 Nits Is Not Enough for « Real » HDR?
- HDMI 2.1 Cables: Do You Need a New Cable for 4K 120Hz HDR?
- OLED Black Levels: How to Adjust Gamma So You Can See in Dark Game Scenes?
- Static vs Dynamic Metadata: Why Dolby Vision Looks Better Scene-by-Scene?
- Windows HDR: Why Does Your Desktop Look Grey When HDR Is On?
- How to Configure QoS Settings to Prioritise Gaming Traffic Over Netflix?
- How to Watch HDR Movies on Mobile Without Crushing the Shadow Details?
- Why AMOLED Panels Offer Infinite Contrast Ratios for Late-Night Reading?
Peak Brightness: Why 400 Nits Is Not Enough for « Real » HDR?
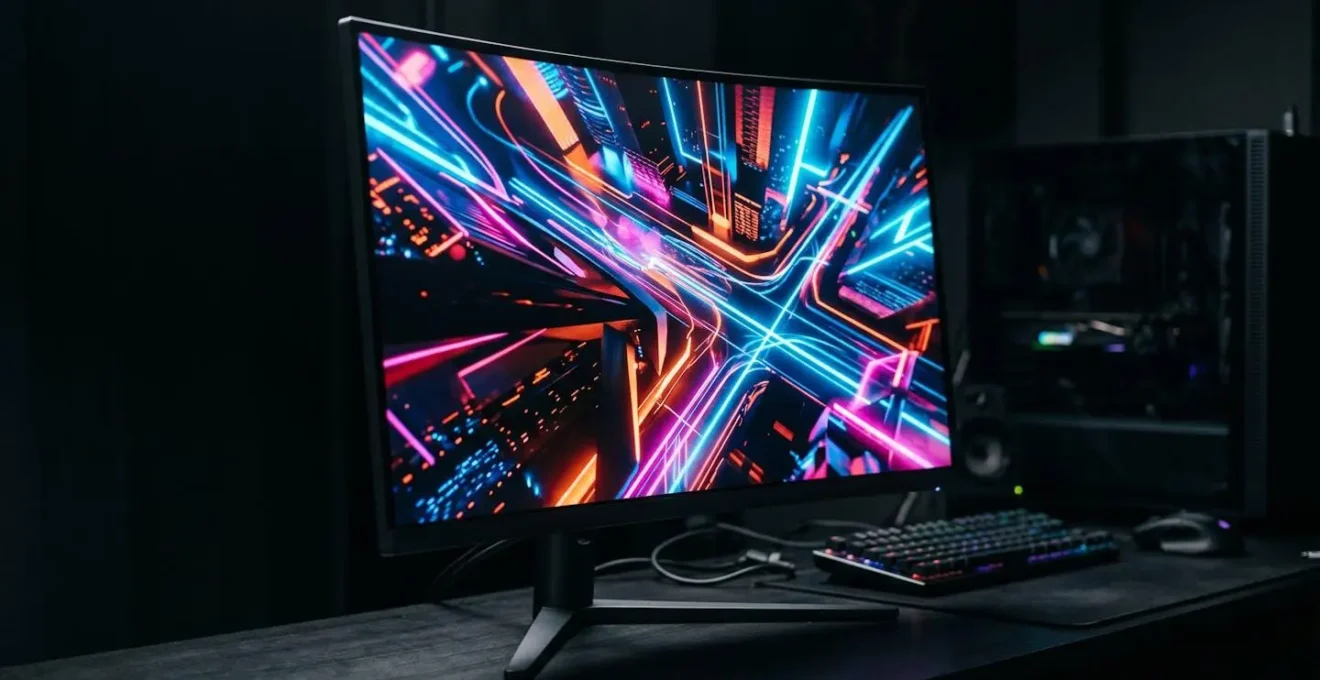
The first and most misunderstood element of HDR is peak brightness, measured in nits. Many entry-level TVs and monitors advertise « HDR support » but only deliver a peak brightness of around 400 nits. This is technically HDR, but it lacks the power to deliver the perceptual impact that makes the technology revolutionary. True HDR isn’t just about making the whole screen brighter; it’s about the range between the darkest black and the brightest white, and specifically, the ability to render intense, small points of light called specular highlights.
Think of the glint of sunlight off a sword, the blinding flash of an explosion, or the intense glow of a starship’s engine. These highlights are what give an image its sense of realism and depth. A 400-nit display simply doesn’t have the luminance headroom to render these moments with the intensity they require. The highlights get « clipped, » appearing as flat white patches rather than brilliant points of light, and the overall image can look dim and underwhelming. As the KTC Play Display Technology Hub notes, « 400 nits is entry-level brightness rather than full HDR impact.«
For a convincing HDR gaming experience, you need to aim higher. Display technology analysis suggests that for monitors, 600 nits is the practical minimum for convincing HDR, with 1,000 nits and above being the sweet spot. At these levels, your display has enough power to render specular highlights with fiery intensity, creating a dynamic, immersive, and lifelike image that 400-nit displays can only hint at. This is the first critical link in the visual fidelity chain: without sufficient light output, the rest of the technology cannot perform as intended.
HDMI 2.1 Cables: Do You Need a New Cable for 4K 120Hz HDR?
If your display is the engine of your visual experience, the HDMI cable is the pipeline that delivers the fuel. For modern consoles like the PS5 and Xbox Series X, which aim for 4K resolution at 120 frames per second (120Hz) with HDR, this pipeline needs to be massive. This is where the HDMI 2.1 specification becomes non-negotiable. An older HDMI 2.0 cable simply does not have the bandwidth to carry the immense amount of data required for this high-fidelity signal.
The numbers are clear: delivering a 4K, 120Hz signal with 10-bit color (a standard for HDR) requires a staggering amount of data. According to display technology standards, a bandwidth of 48Gbps is required for 4K at 120Hz with HDR. HDMI 2.0 cables top out at 18Gbps, creating a severe bottleneck. Using an older cable forces the console to compromise, either by reducing the resolution, dropping the frame rate, or using a compression technique called chroma subsampling, which can degrade color accuracy and introduce artifacts. You might get a picture, but you won’t be getting the full, uncompromised signal you paid for.
Therefore, to unlock the full potential of your console and display, an « Ultra High Speed » certified HDMI 2.1 cable is an absolute necessity. It’s not an upsell; it’s a fundamental component of the visual fidelity chain. Without it, you are starving your high-end display of the very data it needs to shine. Ensuring your cable is up to spec is a critical audit point for any serious gamer.
Action Plan: Verifying Your HDMI 2.1 Cable
- Certification Check: Look for the official « Ultra High Speed » label and holographic image on the packaging to guarantee 48Gbps bandwidth support.
- Length Consideration: For cable runs under 15 feet (approx. 4.5m), standard passive cables are sufficient. For longer distances, invest in an active or fiber optic HDMI cable to prevent signal degradation.
- Feature Support: Verify that the cable explicitly lists support for key HDMI 2.1 gaming features like Variable Refresh Rate (VRR), Auto Low Latency Mode (ALLM), and Quick Frame Transport (QFT).
- Source and Display Ports: Ensure that both the port on your console and the port on your TV are full-spec HDMI 2.1 ports, as the connection will be limited by the weakest link.
- Firmware Updates: Always keep your TV and console firmware up to date, as manufacturers often release patches that improve HDMI 2.1 compatibility and performance.
OLED Black Levels: How to Adjust Gamma So You Can See in Dark Game Scenes?
While peak brightness handles the bright end of HDR, the dark end is equally important, especially for atmospheric games with many shadow-heavy scenes. This is where OLED technology excels, thanks to its ability to turn individual pixels completely off, creating true, absolute black and an « infinite » contrast ratio. However, this strength can become a weakness if not managed correctly. Many gamers complain that HDR games on OLED TVs can « crush » blacks, making it impossible to see details in dark areas. This isn’t a flaw in the TV, but a problem with tone mapping.
Tone mapping is the process by which a TV adapts the HDR signal to the specific capabilities of its panel. When done poorly, the TV’s tone mapping curve can conflict with the game’s intended look, resulting in crushed blacks or blown-out highlights. To solve this, the HDR Gaming Interest Group (HGiG) was formed. HGiG is not a format, but a set of best practices. As noted by experts, « HGiG is designed to improve the HDR gaming experience by ensuring a consistent and accurate HDR presentation across different TVs and games. » When HGiG is enabled, the TV’s own tone mapping is disabled, allowing the console (which knows the game’s creative intent) to handle it directly. This ensures you see the image exactly as the game developers intended.
Case Study: The Impact of HGiG on an LG OLED TV
An excellent real-world example demonstrates the power of HGiG. According to a report from LevelUpTalk, users of a new LG OLED TV initially found HDR games to look dull and washed out. After navigating to the TV’s Game Optimizer settings and enabling HGiG, the difference was immediate. The HDR image came back to life, with proper color saturation and highlight « pop, » all while preserving crucial shadow detail. This shows that the solution to « bad HDR » is often not a different TV, but a simple settings adjustment that correctly aligns the visual fidelity chain.
For any gamer with a compatible TV (most modern LG, Samsung, and Sony models), enabling HGiG through your TV’s game mode settings is the single most important calibration step you can take. It respects the creative intent of the game and leverages your console’s power to eliminate crushed blacks, ensuring you can always see that enemy lurking in the shadows.
Static vs Dynamic Metadata: Why Dolby Vision Looks Better Scene-by-Scene?
Now we arrive at the core of the HDR10 versus Dolby Vision debate: metadata. Metadata is the « instruction manual » sent along with the video signal that tells your TV how to display the HDR content. This is where the fundamental difference lies. HDR10 uses static metadata, which means it provides one set of instructions for the entire movie or game. It tells the TV the brightness values for the single brightest frame and the average brightness of the entire piece of content.
The problem with this « one-size-fits-all » approach is that a game is not uniform. A bright, sunlit desert level has vastly different lighting characteristics than a dark, torch-lit cavern. With static metadata, the TV must use the same general tone mapping curve for both, which can lead to compromises. The dark cavern might look too bright and washed out, or the bright desert might look too dim, because the TV is trying to find a middle ground. This is a significant weak point in the visual fidelity chain.
Dolby Vision (and its rival, HDR10+) solves this by using dynamic metadata. Instead of one set of instructions for the entire game, it can provide instructions on a scene-by-scene or even frame-by-frame basis. This is a game-changer for scene-level optimisation. For the dark cavern, it can tell the TV to optimize for shadow detail and low-light nuance. Then, for the desert level, it can instantly send new instructions to optimize for intense highlights and vibrant colors. The result is a far more accurate and impactful image that is always perfectly tailored to the content on screen. Furthermore, the Dolby Vision format is specified with higher potential brightness, targeting a maximum peak brightness of up to 4000 nits, compared to the 1000 nits often associated with HDR10, giving developers a wider canvas to work with.
Windows HDR: Why Does Your Desktop Look Grey When HDR Is On?
While console gaming HDR has become more streamlined, the PC gaming experience on Windows introduces its own set of challenges. A common complaint from users who enable HDR in Windows is that their desktop, web browser, and other non-HDR applications suddenly look grey, washed-out, and dim. This jarring experience makes many people turn HDR off, assuming it’s broken. This issue stems from a mismatch in how Windows handles Standard Dynamic Range (SDR) and High Dynamic Range (HDR) content simultaneously.
Your desktop, and the vast majority of applications, are designed in the SDR color space. When you switch your display into HDR mode, it’s expecting a bright, wide-gamut HDR signal. To display the SDR content, Windows has to convert it. By default, this conversion process often results in a dim, low-contrast image because the system is reserving the majority of the display’s brightness range for potential HDR content that isn’t currently on screen. You’re seeing the SDR desktop through a « dimming filter, » which causes the desaturated look.
Fortunately, Windows has a built-in solution that is often overlooked. In the « Windows HD Color settings » (accessible by right-clicking the desktop and going to Display settings), there is a slider labeled « SDR content brightness. » This slider allows you to manually adjust the brightness of all non-HDR content while your display remains in HDR mode. By increasing this slider’s value, you can restore the brightness and vibrancy of your desktop and apps to a normal, comfortable level, without affecting how true HDR content (like a game) is displayed.
Mastering this setting is crucial for any PC gamer who wants to use HDR without compromising the usability of their desktop for everyday tasks. It resolves the most common complaint about Windows HDR and ensures the « desktop » link in your visual fidelity chain isn’t a frustrating bottleneck.
How to Configure QoS Settings to Prioritise Gaming Traffic Over Netflix?
The visual fidelity chain doesn’t stop at your display. For online gaming, the stability of your internet connection is a critical, often-overlooked link. A sudden lag spike or moment of high latency can cause stuttering and frame drops that completely shatter the illusion of a smooth, 120Hz experience, no matter how perfect your HDR calibration is. This problem is magnified in a busy household where multiple people are streaming, downloading, and browsing at the same time. This is where Quality of Service (QoS) comes in.
QoS is a feature found in many modern routers that allows you to manage your network’s traffic by prioritizing certain devices or applications over others. Think of it as creating a dedicated express lane for your gaming data on your home’s digital highway. When you’re in an intense online match, your console or PC is sending and receiving thousands of tiny, time-sensitive data packets every second. If someone else starts streaming a 4K movie on Netflix, that high-bandwidth activity can crowd the network and delay your gaming packets, causing lag.
By configuring QoS, you can instruct your router to always give gaming packets top priority. You can typically do this in one of two ways: by prioritizing the specific MAC address of your console/PC, or by prioritizing the specific network ports used by games (though device-based priority is usually easier and more effective). This ensures that even if your network is under heavy load, your game’s connection remains stable and responsive. This prevents the network from becoming a bottleneck that undermines all your careful display calibration work, ensuring your visual experience remains fluid and uninterrupted.
How to Watch HDR Movies on Mobile Without Crushing the Shadow Details?
The principles of HDR are not confined to large television screens. High-end smartphones, especially those with OLED or AMOLED displays, are now fully capable of displaying stunning HDR content from services like Netflix, Disney+, and YouTube. However, the mobile viewing environment presents a unique challenge: ambient light. Watching a dark, moody HDR film in a brightly lit room can make it nearly impossible to discern crucial shadow detail, leading to the same « crushed blacks » problem seen on poorly calibrated TVs.
Mobile device manufacturers and app developers are aware of this. To compensate, they employ sophisticated local tone mapping algorithms that adjust the HDR image based on the phone’s ambient light sensor and screen brightness settings. Unlike a TV in a dark room, a phone must dynamically balance preserving the director’s artistic intent with basic legibility. If you’re watching in a bright environment, the software will intentionally lift the black levels and compress the dynamic range to ensure you can actually see what’s happening in the darker scenes.
To get the best experience, you have two main levers. First, control your environment. Watching HDR content in a darker room will always yield a more accurate and impactful picture, as it allows the display to use its full contrast capabilities. Second, check the app’s settings. Major streaming apps like Netflix have their own playback and brightness settings, sometimes separate from the system’s main brightness slider. Ensure any « power saving » modes are turned off and that the playback quality is set to maximum. By managing both the viewing environment and the software settings, you can ensure the visual fidelity chain on your mobile device is optimized to deliver a powerful HDR experience without losing all the detail in the shadows.
Key Takeaways
- True HDR performance depends on a « visual fidelity chain, » not just one format. A weak link (low brightness, wrong cable) will compromise the entire experience.
- Dynamic metadata (Dolby Vision, HDR10+) is technically superior to static metadata (HDR10) for scene-by-scene optimization, but requires a capable display to show its benefits.
- For gamers, enabling HGiG (HDR Gaming Interest Group) mode is one of the most critical calibration steps to ensure accurate tone mapping and prevent crushed blacks or blown-out highlights.
Why AMOLED Panels Offer Infinite Contrast Ratios for Late-Night Reading?
At the very foundation of an exceptional HDR experience—whether on a giant TV or a mobile phone—lies the display’s ability to control light at a granular level. This is why AMOLED (Active-Matrix Organic Light-Emitting Diode) technology, used in high-end smartphones and premium OLED TVs, is so perfectly suited for high-contrast content. Its defining characteristic is the source of its « infinite » contrast ratio: per-pixel illumination.
Unlike traditional LCD panels, which use a single, constantly-on backlight that shines through a layer of liquid crystals, each individual pixel in an AMOLED display is its own tiny light source. To display black, a pixel simply turns itself completely off. It emits no light whatsoever. This is why blacks on an AMOLED screen are absolute and perfect, not a washed-out dark grey like on many LCDs. The « infinite contrast ratio » isn’t just marketing speak; it’s the mathematical result of dividing by zero (the light output of a black pixel). This perfect black level provides an ideal canvas for HDR.
This same principle is what makes AMOLED displays ideal for comfortable late-night reading. When you’re reading black text on a white background, only the pixels forming the white background are lit. The black pixels are off, consuming no power and, more importantly, causing no light bleed or « halo » effect around the text. This precise luminance control reduces eye strain significantly in dark environments. Whether it’s rendering the pinpoint sparkle of a distant star in a sci-fi game or presenting crisp, clear text in an e-book, the ability of AMOLED to control light on a pixel-by-pixel basis is the fundamental technology that makes superior contrast and true HDR possible.
Ultimately, the quest for the best HDR gaming experience is a technical pursuit. By focusing on strengthening each link in the visual fidelity chain—from a high-nit display and a certified 48Gbps cable to correct HGiG calibration and even network prioritization—you can build a setup that delivers breathtaking visuals, moving beyond the format wars and into the realm of true image fidelity.